学习目标
基于SpringBoot框架的程序开发步骤
熟练使用SpringBoot配置信息修改服务器配置
基于SpringBoot的完成SSM整合项目开发
三、整合第三方技术
1. 整合JUnit
问题导入
回忆一下Spring整合JUnit的步骤?
1.1 Spring整合JUnit(复习)
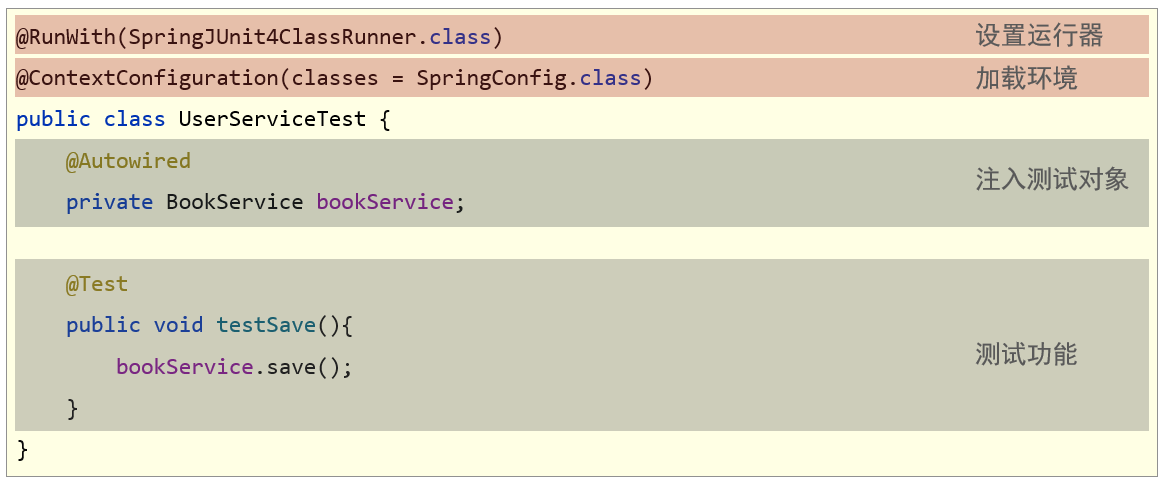
1.2 SpringBoot整合JUnit
【第一步】添加整合junit起步依赖(可以直接勾选)
xxxxxxxxxx


<dependency>    <groupId>org.springframework.boot</groupId>    <artifactId>spring-boot-starter-test</artifactId>    <scope>test</scope></dependency>
【第二步】编写测试类,默认自动生成了一个
xxxxxxxxxx
class Springboot07JunitApplicationTests { private BookService bookService; public void testSave() { bookService.save(); }}
2. 基于SpringBoot实现SSM整合
问题导入
回忆一下Spring整合MyBatis的核心思想?
2.1 Spring整合MyBatis(复习)
SpringConfig
- 导入JdbcConfig
- 导入MyBatisConfig
xxxxxxxxxx
("com.itheima")("classpath:jdbc.properties")({JdbcConfig.class, MyBatisConfig.class})public class SpringConfig {}
JDBCConfig
- 定义数据源(加载properties配置项:driver、url、username、password)
xxxxxxxxxx


#jdbc.propertiesjdbc.driver=com.mysql.jdbc.Driverjdbc.url=jdbc:mysql://localhost:3306/spring_dbjdbc.username=rootjdbc.password=itheima
xxxxxxxxxx
public class JdbcConfig { ("${jdbc.driver}") private String driver; ("${jdbc.url}") private String url; ("${jdbc.username}") private String userName; ("${jdbc.password}") private String password; public DataSource getDataSource() { DruidDataSource ds = new DruidDataSource(); ds.setDriverClassName(driver); ds.setUrl(url); ds.setUsername(userName); ds.setPassword(password); return ds; }}
MyBatisConfig
- 定义SqlSessionFactoryBean
- 定义映射配置
xxxxxxxxxx
public SqlSessionFactoryBean getSqlSessionFactoryBean(DataSource dataSource) { SqlSessionFactoryBean ssfb = new SqlSessionFactoryBean(); ssfb.setTypeAliasesPackage("com.itheima.domain"); ssfb.setDataSource(dataSource); return ssfb;}
xxxxxxxxxx
public MapperScannerConfigurer getMapperScannerConfigurer() { MapperScannerConfigurer msc = new MapperScannerConfigurer(); msc.setBasePackage("com.itheima.dao"); return msc;}
2.2 SpringBoot整合MyBatis
- SpringBoot整合Spring(不存在)
- SpringBoot整合SpringMVC(不存在)
- SpringBoot整合MyBatis(主要)
①:创建新模块,选择Spring初始化,并配置模块相关基础信息
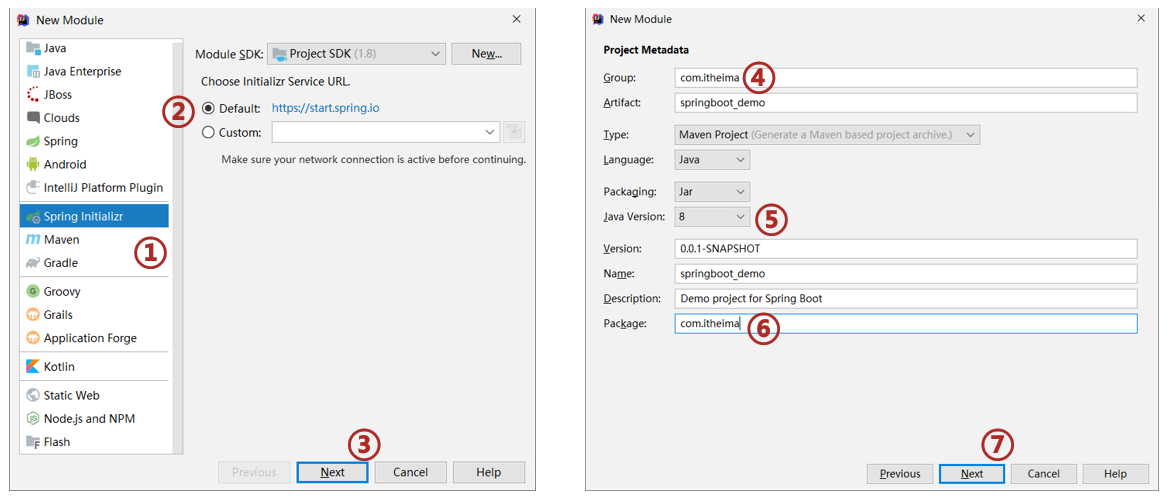
②:选择当前模块需要使用的技术集(MyBatis、MySQL)

③:设置数据源参数
xxxxxxxxxx
spring datasource driver-class-namecom.mysql.cj.jdbc.Driver urljdbcmysql//localhost3306/ssm_db?serverTimezone=UTC usernameroot passwordroot typecom.alibaba.druid.pool.DruidDataSource
注意事项:
- SpringBoot版本低于2.4.3(不含),Mysql驱动版本大于8.0时,需要在url连接串中配置时区,或在MySQL数据库端配置时区解决此问题
xxxxxxxxxx


jdbc:mysql://localhost:3306/ssm_db?serverTimezone=UTC
④:定义数据层接口与映射配置
xxxxxxxxxx
public interface UserDao { ("select * from tbl_book where id=#{id}") Book getById(Integer id);}
⑤:测试类中注入dao接口,测试功能
xxxxxxxxxx
class Springboot08MybatisApplicationTests { private BookDao bookDao; public void testGetById() { Book book = bookDao.getById(1); System.out.println(book); }}
2.3 案例-SpringBoot实现ssm整合
【第一步】创建SpringBoot工程,添加druid依赖
xxxxxxxxxx


<!-- todo 1 添加druid连接池依赖--><dependency>    <groupId>com.alibaba</groupId>    <artifactId>druid</artifactId>    <version>1.2.6</version></dependency>
【第二步】复制springmvc_11_page工程各种资源(主java类、页面、测试类)
【第三步】删除config包中的所有配置,在BookDao接口上加@Mapper注解
xxxxxxxxxx
//todo 3 在BookDao接口上加@Mapper注解,让SpringBoot给接口创建代理对象public interface BookDao { //...}
【第四步】将application.properties修改成application.yml,配置端口号和连接参数
xxxxxxxxxx
server port80# todo 4 配置数据库连接参数spring datasource driver-class-namecom.mysql.cj.jdbc.Driver urljdbcmysql//localhost3306/ssm_db usernameroot passwordroot typecom.alibaba.druid.pool.DruidDataSource
【第五步】修改BookServiceTest配置类,进行配置
xxxxxxxxxx
// todo 5 修改单元测试类,添加@SpringBootTest主键,修复@Test注解导包public class BookServiceTest { private BookService bookService; public void testGetById(){ Book book = bookService.getById(2); //传递参数1会抛出异常 System.out.println(book); } public void testGetAll(){ List<Book> all = bookService.getAll(); System.out.println(all); }}
【第六步】在static目录中提供index.html页面,跳转到"pages/books.html"
xxxxxxxxxx


<script>    location.href="pages/books.html"</script>
最后:运行引导类即可访问